

Thinking to replace your current tiles?
The Tileco WA Bathroom Renovation Process: Bringing Your Vision to Life
A bathroom renovation is an exciting journey that transforms one of your home's most essential spaces. At Tileco WA, we manage every stage with precision, care, and clear communication, ensuring a smooth and stress-free experience from start to sparkling finish. Here’s a general overview of our process:
Step 1: Initial Consultation & Design (Your Vision, Our Expertise)
- Discussion: We start by understanding your vision, needs, budget, and desired style. Whether it's a sleek modern look, a classic aesthetic, or something uniquely yours, we listen.
- Site Visit & Assessment: We inspect your existing bathroom, taking measurements and assessing plumbing, electrical, and structural considerations. This is crucial for planning, especially in older homes.
- Personalisation & Material Selection: We provide expert tips, examples, and guidance on selecting the perfect tiles (porcelain, stone, ceramic, various sizes), fixtures, and fittings to match your aesthetic and functional requirements. This includes discussing grout types (standard vs. epoxy) and patterns.
- Detailed Quote & Project Plan: Based on our discussions, you'll receive a transparent, detailed quote and a projected timeline for your project.
Step 2: Demolition & Preparation (The Strip-Out)
- Protection: Before any work begins, we meticulously protect your home's surrounding areas from dust and debris.
- Disconnection: Licensed plumbers and electricians disconnect existing services (water, power) safely.
- Demolition: This is where the transformation truly begins! Our team carefully strips out the old bathroom, removing existing tiles, fixtures (vanity, toilet, shower, bath), and even walls if the layout is changing. We handle all waste removal efficiently.
Step 3: Rough-In Plumbing & Electrical
- Structural Adjustments: Any necessary structural changes, framing for new walls, niches, or shower recesses are completed.
- New Plumbing & Electrical Lines: Our licensed plumbers and electricians run new pipework and wiring according to the approved design. This includes positioning for your new vanity, toilet, shower, bath, lighting, and power points. Precise measurements here are critical for a perfect tile layout later.
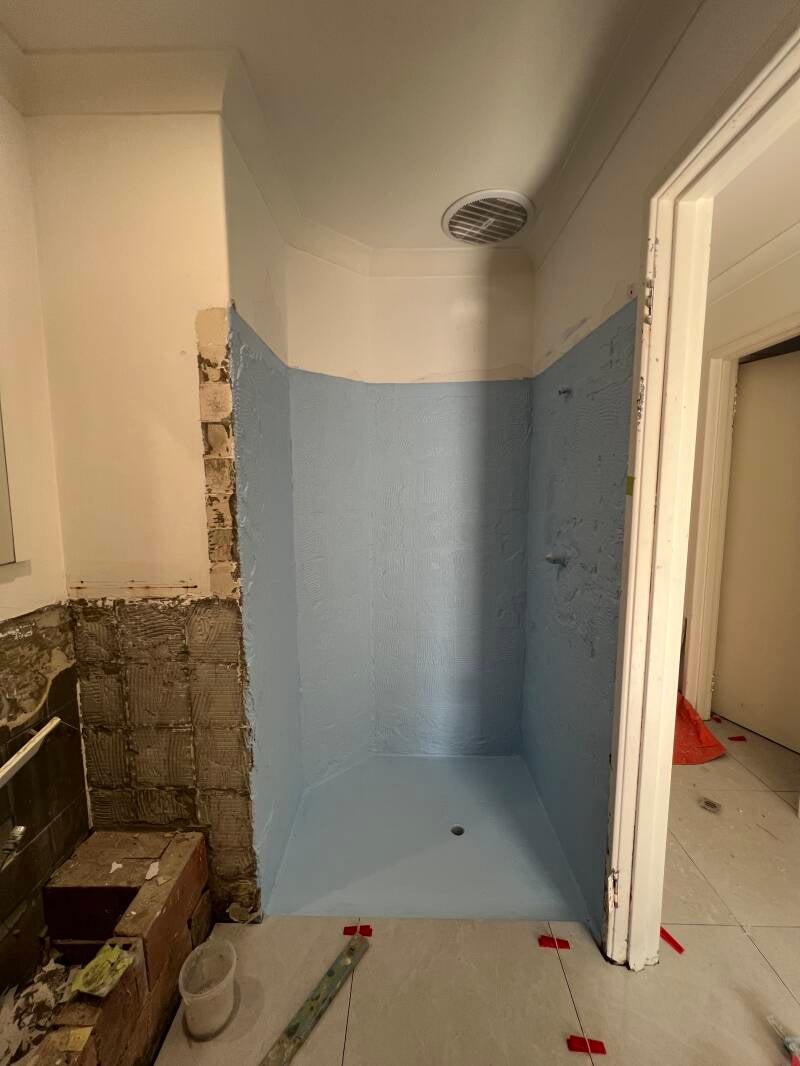
Step 4: Sheeting, Screeding & Waterproofing (The Foundation of Durability)
- Wall & Floor Sheeting: Appropriate wet area plasterboard (like Villaboard) is installed on walls and ceilings to create a stable, moisture-resistant surface.
- Floor Screeding: A crucial step for bathroom floors, screeding involves applying a cement-based mixture to create the correct fall to the drain. This ensures efficient water flow and prevents pooling, which is vital for long-term durability and compliance.
- Waterproofing (Critical for WA Homes): Our qualified and certified waterproofers apply a high-quality waterproofing membrane to all wet areas (shower, floor, and typically 150mm up walls). This is a non-negotiable step in Australia to prevent leaks and mould, and it requires a specific curing time to be effective. We exceedindustry standards for this critical phase.
Step 5: Tiling & Grouting (Where Your Vision Comes to Life)
- Meticulous Laying: This is our specialty. Our expert tilers carefully lay your chosen tiles on the floor and walls, paying close attention to patterns, symmetry, and precise cuts. We are known for our emphasis on details and ability to handle various tile sizes and complex patterns.
- Grouting: Once the tiles are set, we apply the chosen grout (standard or epoxy), ensuring uniform coverage and a clean finish that complements your tiles and enhances their longevity.
- Curing Time: Grout also requires time to cure properly before the next steps.
Step 6: Fit-Off & Finishing Touches
- Fixture Installation: The plumber returns to install and connect all your new fixtures – vanity, basin, toilet, shower head, taps, and bath.
- Electrical Fit-Off: The electrician installs light fittings, power points, heated towel rails, and exhaust fans.
- Shower Screen & Accessories: The shower screen is installed, along with mirrors, towel rails, and any other accessories.
- Painting & Sealing: Any necessary painting or touch-ups are completed, and silicone seals are applied around fixtures and joints for a seamless, waterproof finish.
Step 7: Final Inspection & Handover (Enjoy Your New Space!)
- Quality Check: We conduct a thorough final inspection to ensure every element meets our high standards and your expectations.
- Professional Clean: The site is professionally cleaned, removing all renovation debris.
- Client Walk-Through: We walk you through your new bathroom, ensuring you are completely satisfied with the transformation.
- Enjoy: Your beautiful, functional new bathroom is now ready for you to enjoy for years to come!

The Tileco WA Main Floor & Large Area Tiling Process: Seamless & Stunning Transformations
Transforming your main living areas, commercial spaces, or expansive outdoor zones with new tiling can dramatically enhance a property's appeal and functionality. At Tileco WA, we specialise in delivering flawless, durable, and aesthetically pleasing tiling solutions for large-scale projects, designed to withstand the demands of daily life.
Our expertise extends to various areas, including:
- Main Floors: Living rooms, kitchens, hallways, open-plan areas.
- Bathrooms & "Rests" (Restrooms/Toilets): Ensuring continuity and quality throughout.
- Balconies & Alfrescos: Creating durable and beautiful outdoor extensions.
- Both Indoor & Outdoor Applications: Catering to all environments.
Here’s how we ensure a superior finish for your main floor and large area tiling project:
Step 1: Consultation & Strategic Planning
- Understanding Your Space: We begin with a detailed discussion about your specific area (main floor, commercial space, large outdoor area), your vision, traffic requirements, and aesthetic preferences.
- Material Guidance: We offer expert advice on the best tile types (porcelain, stone, large format, feature tiles), sizes, and finishes to suit your lifestyle, durability needs, and design goals.
- Subfloor Assessment: Crucially, we assess the existing subfloor or surface. This determines the optimal preparation method.
- "Tile on Tile" Assessment: A key aspect of our consultation involves assessing if a "tile on tile" application is suitable for your area. For many main floors, bathrooms, restrooms (rests), and balconies, where the existing tiles are sound, level, and well-adhered, we can often lay new tiles directly over the old, potentially saving time and reducing demolition dust and cost. We’ll clearly explain if this is a viable and recommended option for your specific project.
- Detailed Proposal: You receive a transparent quote and a clear project timeline.
Step 2: Meticulous Preparation
- Surface Cleaning & Levelling: Whether it's a new subfloor or an existing tiled surface, thorough cleaning and preparation are paramount. We address any cracks, unevenness, or imperfections to create a perfectly stable and level base for tiling.
- Moisture Management: For outdoor areas and wet zones like bathrooms and balconies, essential waterproofing and screeding are meticulously applied to ensure long-term durability and compliance, protecting your investment from moisture ingress.
- "Tile on Tile" Preparation (If Applicable): If determined suitable, the existing tiles are thoroughly cleaned, primed, and prepared to ensure maximum adhesion for the new layer. This precise preparation is key to the success of a tile-on-tile installation.
Step 3: Precision Tiling & Grouting
- Expert Layout Planning: Our skilled tilers meticulously plan the tile layout, ensuring symmetry, minimal cuts, and optimal flow, especially crucial for large and open areas.
- Flawless Installation: Using advanced techniques and the correct adhesives for your chosen materials and environment (indoor/outdoor, standard/tile-on-tile), we lay your tiles with exceptional precision and attention to detail, creating a seamless and beautiful surface.
- Grouting: Once the tiles are perfectly set, we apply the appropriate grout (standard or epoxy), ensuring consistent coverage and a clean finish that enhances the overall aesthetic and protects your installation.
Step 4: Final Touches & Handover
- Thorough Clean-up: We ensure the workspace is left immaculately clean, removing all debris and materials.
- Quality Inspection: A comprehensive final inspection is conducted to ensure the installation meets our stringent quality standards and your complete satisfaction.
- Care Instructions: We provide guidance on maintaining your new tiled surfaces to keep them looking pristine for years to come.
With Tileco WA, your main floor, bathroom, restroom, or balcony tiling project, whether a new build or a renovation, is in expert hands. We deliver durable, beautiful results, often with the efficient option of tile on tile, that truly transform your space.

Whether you're planning a grand main floor transformation, a comprehensive bathroom renovation (including full demolition, screeding, and waterproofing), or a new build, we bring unparalleled precision and professionalism.
Our expertise extends to the fine details of smaller jobs like elegant staircase tiling and stunning kitchen or laundry splashbacks, ensuring every corner of your property reflects superior craftsmanship.

Additional info
We can supply and install for your project.
We can advise our clients some good recommendations of shops and showrooms for your renovation projects or new build.
Create Your Own Website With Webador